You need a site plan for a permit. Maybe you want to draw it yourself. Maybe you want to understand what you’re ordering before you order it professionally. Either way, this guide gives you every step.
I’m Engineer Wasim of Site Plans Online USA. Here’s the complete process.
Before You Draw: What You Need to Gather
Gathering the right information before you start saves you from having to restart the drawing.
Step 1 — Get your lot dimensions Source from one of these (in order of reliability):
- Existing survey — most accurate
- County property appraiser GIS portal — search your address, find parcel dimensions
- Deed or title documents — lot dimensions often stated
- County plat map — if your property is in a recorded subdivision
Step 2 — Get your APN (Assessor’s Parcel Number) Find this on your county assessor or property appraiser website. This goes on the title block.
Step 3 — Look up your setback requirements Go to your city or county’s zoning portal. Find your zoning district (usually starts with R-1, R-2, etc.). Look up: front setback, rear setback, side setbacks, and maximum impervious surface (lot coverage).
Step 4 — Understand your building department’s format requirements Most require: PDF format, specific scale (usually 1″=20′), both written and graphic scale. Some have specific portal naming conventions.
The 8 Steps to Drawing a Permit Site Plan
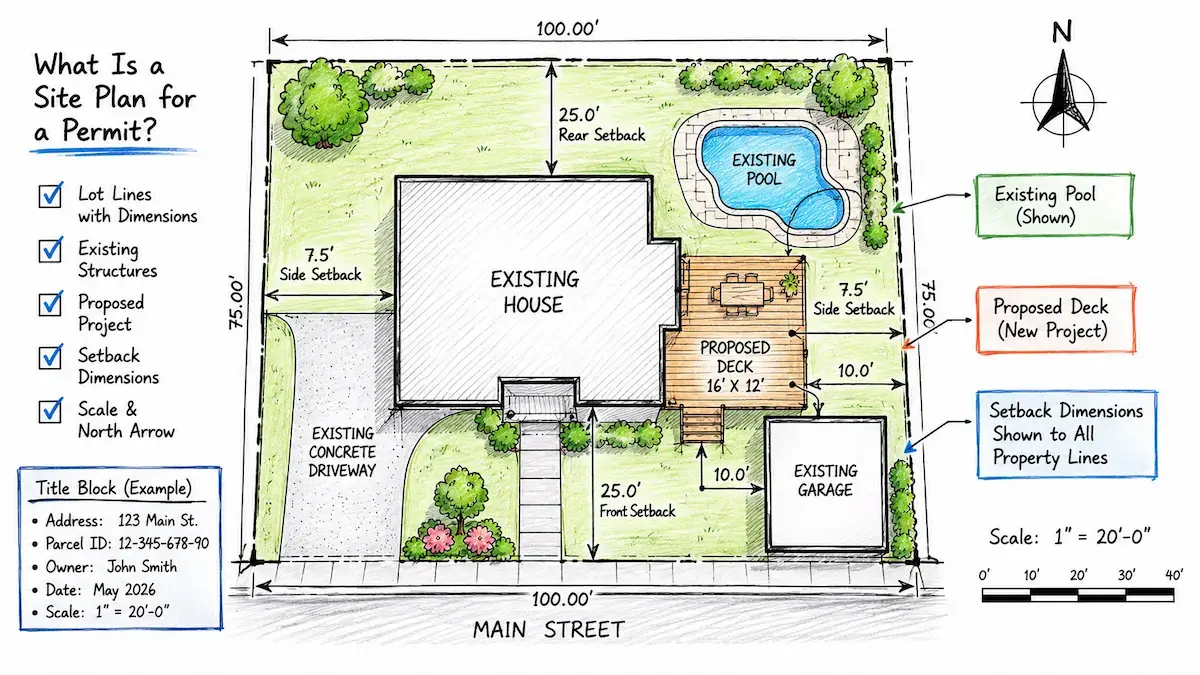
Step 1 — Set Your Scale
Choose 1″=20′ for most residential lots. If your lot is very small or you’re showing detailed work close to property lines, 1″=10′ gives more clarity.
On graph paper: at 1″=20′, each ¼” square = 5 feet. In CAD: set your model space to actual feet, print at 1:240 (1 inch = 20 feet).
Step 2 — Draw Your Property Lines
Draw all lot lines to scale with dimensions labeled. Identify the front property line (facing street). Label adjacent street names.
Step 3 — Add All Existing Structures
Draw every structure on the lot: house, garage, shed, pool, driveway, patios, fences. Draw them in their correct positions relative to the property lines, to scale. Label each structure. Add dimensions to the house footprint at minimum.
Step 4 — Add the Proposed Project
Draw the new project in its intended location, using dashed lines or different line weight to distinguish it from existing. Label it “PROPOSED [DECK/POOL/FENCE/ADDITION].” Add dimensions.
Step 5 — Add All Setback Dimension Arrows
Draw dimension arrows from each side of the proposed structure to the nearest property line. Label each with the distance in feet. You need all four: front, rear, left side, right side.
Step 6 — Calculate Impervious Surface
Add up all hard surfaces (existing + proposed). Divide by lot area. Show the calculation in a text block on the plan.
Step 7 — Add Project-Specific Elements
For pool: barrier location, height, gate details, equipment pad. For fence: height, gate locations, sight triangle if corner lot. For commercial: parking layout, ADA spaces, fire lane.
Step 8 — Add Title Block and Final Elements
Title block in a corner: property address, APN, owner name, preparer, date, scale. North arrow and graphic scale bar added.
Common Mistakes That Cause Rejection
1. Scale looks correct but isn’t verified. The plan says 1″=20′ but the dimensions on the drawing don’t actually match that scale. Reviewers measure it.
2. Using the wrong setback standard. Attached decks use principal structure setbacks. Freestanding sheds use accessory setbacks. Mixing these up puts wrong numbers on the plan.
3. Forgetting the graphic scale bar. Written scale alone is not enough in most jurisdictions. The graphic bar is a separate requirement.
4. Not labeling fence height. Fence permit site plans must state the fence height in feet on the drawing.
5. Missing pool barrier gate details. Self-closing, self-latching, outward swinging — all of this must be noted on pool permit plans.
Full rejection guide: Why Site Plans Get Rejected
When to Skip DIY and Order Professionally
If any of these are true, ordering a professional plan is the better choice:
- Your contractor’s schedule depends on the permit timeline
- The project is a pool, ADU, or commercial work
- You’re in California or Florida (complex state-specific requirements)
- You’ve already had one plan rejected
- Your lot is on a slope, has easements, or is in a flood zone
Our professional site plans are delivered within 12–24 hours. Cost starts from a flat rate for simple projects. Free revisions if the building department requests corrections.
- How to Create a Site Plan for a Building Permit
- Get a Site Plan for Permit
- Site Plan Example for a Permit
- DIY vs Professional Site Plan
- Construction Site Plan Checklist
- Site Plan Drawing Requirements
- Site Plan for a Fence Permit
Take the Next Step With Confidence
Avoid unnecessary delays and prepare for your permit application with greater confidence. Use our free tools to review your project and understand the next steps before moving forward.
ADU Feasibility Checker
Check whether your property may be suitable for an accessory dwelling unit.
Check ADU Feasibility 02Site Plan Checker
Review your drawing for common missing details and potential submission issues.
Review Your Site Plan 03Permit Requirements Checker
Identify the likely permit requirements for your location and project type.
Check Requirements 04Site Plan Cost Calculator
Get a quick site plan cost estimate based on your project requirements.
Calculate Your CostGet Your Permit Drawing Scope Reviewed
Send us the property address and project details. We’ll help identify the likely drawing scope and next step.

Engineer Wasim
Civil/Structural Engineer and founder behind Site Plans Online USA. His permit-drafting experience dates back to 2015, supporting residential, commercial, structural and site-development projects.
Learn More About Site Plans LLC →